Wednesday, January 22, 2020

Paradise Island Hut

     I'm counting down the days until my paper crafting cruise. February 9 is fast approaching. I have signed up for the card swap. 15 cruisers are swapping cards. For this cruise the only requirement for the cards, is the use of at least one Karen Burniston die. I did not use one of Karen's wonderful pop up card bases, but there are several of her die cuts on this card. I actually started off with a Silhouette design of my own. This is a Circle Step Card base (blue) cut using a cut file that I created. I also added the mat (Sandy Beach) to fit over the top. 

Card with Envelope

     I started with a tropical island hut that I purchased from Silhouette. I made a few minor changes and elected not to use the palm trees from this file. The palm trees are Burniston dies - as well as the beach ball, sandals, and shells. The surf board is another file purchased from Silhouette.


     The shells are inked and embellished with a pearl each. The "Bon Voyage" die was a lucky find. I don't exactly remember from where I acquired it, but I know that I got it as an add-on to an order so that I could get free shipping. I love the font and have already used it twice.

Inside of Card

     The inside of this card had to be completed first. It is easier to see the inside in person, but very hard to get a pic of it. BTW: love this sentiment! "Wander where the wifi is weak"

     This is the third time I have used my Circle Side Step Card base. To see the others go to: Circle Step Baby Ark and Hopeful Turtle.

     Thought I would mention: This card (as well as all 15 swaps) was made ENTIRELY from my stash. Now you can be super proud of my penny-pinching.........or........you can be dazzled by the vastness of my stash - your choice.


Materials List:
    
     Card Stock: Bazzill - Bluebird
                                   Chocolate Malt
                       My Colors - Herb Garden
                                        Chocolate
     Patterned Paper: Echo Park - Let's Be Mermaids
     Stamp: Elizabeth Craft Designs - Sun & Surf
     Dies: Burniston - Palm Tree Pop Up
                              Beach Charms
                              Tropical Scene
                              Palm Tree & Pail
             Precision Cutting Die - Bon Voyage
     Silhouette File: Circle Step Card Base by Sharon Fontenot
                           Tiki Hut by Sarah Bailey
                           3 Retro Surf Boards by Snapdragon Snippets
     Ink: Momento - Tuxedo Black
            Distress - Black Soot
                          Vintage Photo
    Embellies: Ivory Pearls 

Sunday, January 5, 2020

Hello Yellow

     I dug out some old stuff to make this card. I used an old stamp set and rummaged through the "black" drawer for some embellishments.


     I used this sketch by Heather Hall over at Sketch N Scrap.


Card Sketch #161 by Heather Hall
      Old embossing folders were used for two of the mats. The row of gems in the background, the circle of gems in the center, and the bow are all out of my embellishments stash. 

Inside of Card
    The inside of card started off with a die cut black circle and a fussy cut bird that were originally for the front of the card; but in the course of designing, they ended up on the scrap pile. I used the same basketweave embossing folder here but left 1 1/4 inch of the card stock sticking out the bottom. I scored two lines to make a border. This leaves a smooth place to sign the card.

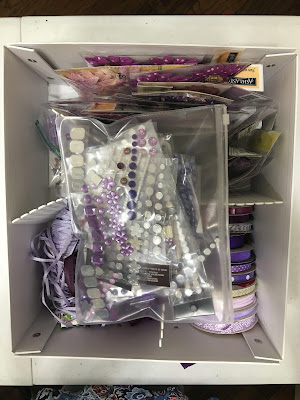
     Earlier in the post, I mentioned the "black" drawer. Well, I actually have 16 embellishment drawers - in this order - purple, blue, turquoise/teal, green, yellow, orange, silver/gold, red/white/blue/patriotic, red, pink, brown, gray, ivory, black, white, wood. I used to have all of my embellishments in two drawers and every time I wanted something, I would have to empty them both to find anything. I also had a separate drawer of just gems, pearls, and dots. Funny thing is that I can't even remember WHERE I put my ribbons before this system. I started using these drawers when I moved to this house 3 years ago.


Turquoise, yellow, pink, ivory, black drawers open.
Blue, green, pink, brown drawers open.
Close-up of purple drawer
     Some might thing this was a royal mess, but I love this mess. When I want "something purple", I can refine my search to just one drawer of goodies. Each drawer contains ribbon, lace, paper and silk flowers, twine, and anything else that I come across that is purple.


     Thrown in on top of each drawer is a 9 x 7 clear zippered case containing gems, pearls, and such.


     Here is the tower of 16 drawers. I got them discontinued at Michael's. With coupons and % of and such, they were a huge bargain.

Materials List:
    
     Card Stock: Gina K - Lemon Drop
                                   Black Onyx
                                   White
     Stamp: Stampin' Up - Merry Moose
     Dies: Sizzix - Circles
             Burniston - Word Set 1(Greetings)
     Stamps: Stampin Up - Betsy's Blossoms
                  Gina K - Sun-Kissed
     Embossing Folder: Cuttlebug - Polka Dot Spots
                                 Darice - Basketweave
     Ink: Momento - Tuxedo Black
            Gina K - Lemon Drop
     Embellies: Prima Marketing - Say it in Pearls
                     Mark Richards - Crystal Stickers
                     Heidi Swapp - Bows
                     Ribbon - 1/4" Black Satin

Wednesday, January 1, 2020

1 - 2 - 3 Look At Me

     Here is a layout of my granddaughter doing show-and-tell. They bring something to pre-k every Friday. There is a letter of the week and she usually brings something that starts with that letter. 

Add caption
     I started out with this sketch by Lisa Hidy at Sketch N Scrap. Just love the two strips down the side. Also it holds 4 - 3 x 4 pics. Makes a great layout.

Sketch #192 by Lisa Hiday
     I constructed a 1-inch border from heart patterned paper. I then trimmed a sheet of green polka paper to fit inside the frame leaving a 1/8-inch border. There was some rainbow striped paper, which I used to make the two paper strips on the left side. 
     Fun thing: there are Silhouette files to match this paper collection. I measured the stickers for the camera and the "look at me". I was able to make two mats for the camera perfectly cut on the Silhouette. I used the shape tool to make 3 rounded corner rectangles. I welded these plus the outline of the "look at me" sticker. This made a one-piece title.


     I used one of the journaling strips from the 3 x 4 cutouts. The mini camera is a little wood veneer which I colored with Copic markers and added a fancy gem. I repeated the gems in the center of the flower and one on the bottom of the paper strips. 
     My daughter called this am to say that she particularly liked it. I guess that was my true intent anyway. 


Materials List:
    
     Patterned Paper: Echo Park - Playground
     Card Stock: Coordinations - Black Iris
                       My Colors - Ivory
     Copics: B95,97, 99
     Embellies: Recollections - Navy gems
                                           Paper flower
     Silhouette File: Echo Park - Camera
                                             Look At Me