Friday, August 20, 2021

Eat Something Sweet

     I made another grab into the Paper Pumpkin lot from my garage sale find. This one is called "Boo-tiful Bags" from September 2014.      


      I recently found a spider border die at garage sale and wanted to use it. I decided to do three 4-inch strips for my background (lots of border opportunity). I also got out my "Ooze" border (gotta love this one).  

     From the kit I was able to incorporate: the sequins, black twine, stamps, the striped patterned paper, and the burlap bags. 
     I love double mats, so everything is double matted. 


     I made this tag using a dotted oval from the kit, the striped patterned paper, bat stickers, and a stamp.


     This journaling tag started as square on one end and rounded on the other. It had a tangerine border. Here is another find from the garage sale - same table as the Paper Punpkin boxes. There was a wood mounted Stampin' Up 2002 stamp of just squiggly lines. I used post-it notes around the border to stamp lines for journaling. I fussy cut the black patterned paper at the top and added an eye using a circle punch, and a VERY small tree stamp. I topped it off with a loopy bow (I think this looks a bit like spider legs). This was so much fun that I had to do it again.... minus the journaling bit. The 'eye-dea' comes from Rachel Tessman. You can see a video to make it here.


     Notice that the loopy bow is not so squiggly. I used a mini hair straightener. I bought it to straighten ribbon in the craft room, but now I see that it also works on twine. Hey, this is a great pic of that spider border. I just love fun border punches.

The namesake of the kit - Boo-tiful Bags

  BUT I DIDN'T WANNA MAKE TREAT BAGS!!!


     I cut the tops off of two of the bags and pulled the threads to make fringe. The last step was taking the sequins ribbon apart and making a trail of sequins to link the pages together.

Materials: 
   Patterned Paper: Stampin' Up - Paper Pumpkin September 2014
   Card Stock: Bazzill - Her Majesty
                                      Sour Apple
                       My Colors - Black Magic
   Stamps: Stampin' Up - Paper Pumpkin September 2014
                 The Stamps of Life - (Trick or Treat)
   Ink: Gina K - Tangerine
   Punches - Martha Stewart - Ooze
                                                Spider
                              

Thursday, August 19, 2021

Mother/Father Combo

      This is a layout using materials from the May 2013 Paper Pumpkin. This was most difficult. The papers were such light colors and there were almost no materials in the kit to work with. Oh, and the stamps - YUK!


     I ended up using the patterned paper from the kit and incorporating 2 stamp/die sets from my stash. The first is Vibrant Vases and the Vase Builder punch from Stampin' Up. This was a find from a garage sale in July. The other was a set released by The Stamps of Life in May called Stamps 4 Guys.


Stamps 4 Guys


Vibrant Vases


     I used some of the patterned paper to make a spot for journaling on each page of the layout. I embellished with black brads. I added shiny orange leaves to the Mother' Day side and star gems to the Father's Day side, both from my stash.


Materials:
   Paper Pumkin: Good Life Brag Book - May 2013
   Card Stock: Bazzill - Burning Embers
                                      My Colors: Black Magic
                                      Dear Lizzy: Christmas Winter Wishes
   Ink: Gina K - Stormy Sea
                         Coral Reef
                         Prickly Pear
                         Tranquil Teal
   Stamps: Stampin' Up - Vibrant Vases
   Dies: Burniston - Happy Mother's Day
                               Happy Father's Day
                               Long Natures Edges
            The Stamps of Life -- Stamps 4 Guys
   Punches: Stampin' Up - Vase Builder
   Embellies: Black Brads 
                     Gold Star Gems


Wednesday, August 18, 2021

Pepper, the Poodle

      This Saturday is my granddaughter's birthday. She just loves dogs and they have a new puppy. It is a miniature poodle named Pepper. Karen Burniston and I had a conversation back in July about how to make a black poodle. I hope she will not be too disappointed in the result.

Pepper, the Poodle

   I started off by purchasing a digital paper for the poodle panels. This is from Etsy. I use Etsy digital paper frequently.  I thought this squiggly print was just like Pepper. This paper is printed on white card stock in a printer, so it has a white core. I inked all of the pieces, so the white core would not stand out.


   I am not going to describe the entire process here. You can check out Karen Burniston's how-to video here.
   In order to make this dog a poodle I used black yarn to wrap the top of the ears and to make 2 pom poms. The diameter of the pom poms are 1.5 inch and 2 inches. The larger pom pom is for the top of the head. I just pierced 2 holes in the top of the head, pulled the yarn through and tied a knot. Easy-peasy!


     Making the tail was a bit more challenging. I had a vision of how I was going to accomplish this, but the end result was totally different. I wanted a spring for the tail so it would bounce. I was thinking the spring that come in pens would be good. I told my husband I was looking for a spring. He says, "You can look in my 'SPRING BOX' to see if there is something that will work." ---a SPRING BOX! Is that a thing????

YEP - IT IS A THING!!!


   I constructed the tail before closing the bottom bitty ball. The materials I used were a 1.5 inch pom pom with two long tails, 1/8 inch hole punch, 6 hole reinforcers stacked to make sturdier, dental floss threader, and a spring.


   I punched a hole in the bottom bitty ball about 1/4 inch from edge, centered top to bottom. Make sure hole is going to be on the back of your poodle and not in one of the panels with the folded wings. I then used scissors to cut a slit from the hole to the edge of the panel.


   I slid the spring into the hole from the slit.


   Making sure that the hole is visible in the spring, use the dental floss threader to pull the two yarn tails of the pom pom through the spring.


   Push the spring as far into the hole as possible (away from the edge of the panel). Cut a slit in the hole reinforcer. Add glue to the reinforcer (The adhesive on the hole reinforcer will not last.) and slide the reinforcer through the spring. The reinforcer will stick out of the edge of the panel. Trim it flush with the edge.


   Wrap one of the pom pom tails around the spring, getting it caught in the rings of the spring. Finally tie the 2 pom pom tails in a knot. Trim the tails.


   I assembled the ball as per Karen's instruction video. It may have been easier to connect this panel first, but I didn't do it that way. Ultimately I hesitate to recommend this. I have a feeling that it would be easier to do that panel first.

   I am sure there are a dozen different/better ways to add a poodle tail. I am happy with it! It doesn't hang down and it bounces - these were my goals.


   I did not put the poodle in a card. I attached it to the top of the gift box. My grandkids don't really like getting the bitty balls in cards. They would prefer to PLAY with them. The first time this happened I had to destroy the card to get the bitty ball unicorn off of the card. What a waste of time!!! 

I attached Animal Crossing digital paper to the top of the gift box. Animal Crossing is so new that gift wrap is not readily available yet. When I want copyrighted prints, such as Cat in the Hat, Mario, Pokemon, Yogi Bear, Doc McStuffins, John Deere, and now Animal Crossing, I raid the Etsy digital paper stores. If you search "digital" on my search box at the top of this page, you will see examples of this.


Materials:
   Patterned Paper: Black & White Digital Paper Pack by pointandpoem (Etsy Store)
                              Animal Crossing Themed Digital Paper by Findings Photo Designs (Etsy Store)
   Card Stock: My Colors - Black Magic
                                           Snowbound
                                           Firecracker
                      Specialty - Holographic
                                        Shiny Black
   Dies: Burniston - Bitty Ball Pop-Up
            The Stamps of Life - Foxes 2 Stamp Dies (alphabet)
   Ink: Distress - Black Soot 
   Embellies: Black Yarn
                     White Gel Pen
                     Spring (1/4 inch diameter; 1.5 inch long)

Monday, August 16, 2021

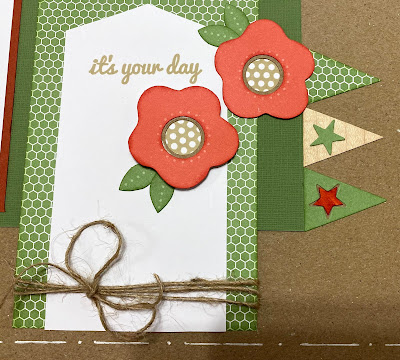
It's Your Day

     Here is my second layout for the June 2015 Paper Pumpkin. To see the first and read about my "Find from the Past" go here.

     For this one basically made a greeting card front on each page and added mats. I used the jute twine, pre-made flowers, wood veneer and sticker banners and stars provided in the kit.


   The flower centers are from a Stamps of Life stamp called Flowers 2 Fill. 

   For the layout border I used a ticket stub punch in the corners and a white gel pen to make a dot-dash pattern.


Materials: 
   Stampin' Up - Paper Pumpkin September 2014   
                              Patterned Paper 
                              Stamps 
                             Wood Veneer banners 
                              Flower cut-outs 
                              Stickers
   Card Stock: Bazzill - Burning Embers
                       My Colors - Snowbound
                                           Desert Cactus
                                            Kraft
   Stamps: The Stamps of Life - Flowers 2 Fill
   Ink: Gina K - Tangerine
                          Kraft
                          Grass Green
   White Gel Pen 


Sunday, August 15, 2021

Happy Thoughts

     I hit a jackpot at an estate sale a couple of weeks ago. I got 15 Paper Pumpkins, most never opened. They are all dated between 2013 and 2015. I have never been particularly interested in Paper Pumpkin. I prefer to design my own cards and layouts.  Kits are super fun when you leave the safety of the directions sheet.


      I closed my eyes and picked the kit "Happy Thoughts" from the pile. The kit gives directions for cards, but I wanted to make a layout so... I did some Pinterest research and found an entry from Remarkably Created.  I started to CASE it, but ended up going rouge. Her layout looks like this... 

     I turned it into a 2-page layout. I moved the banner and used my Copics to color the wood veneer banners. I changed the jute twine to gray twine to match the mat I chose. There were 3 clear buttons included. They are the centers of 3 chosen flowers. I loved stamping the flowers on the background and brought in another stamp set from The Stamps of Life called Flowers 2 Fill. I stamped gingham print in the centers and used the leaves from this set as well. 

Buttons in flower centers

Copic-colored veneer banner

      My original plan was to get as much of the kit onto these 2 pages, but the kits have way too much stuff in them for that. I ended up making another 2-page layout, which you can see here tomorrow.

Materials: 
   Stampin' Up - Paper Pumpkin September 2014   
                              Patterned Paper 
                              Stamps 
                              Wood Veneer banners
                              Clear Buttons
   Card Stock: Bazzill - Sugar Wafer
                       My Colors - Snowbound
   Stamps: The Stamps of Life - Flowers 2 Fill
   Ink: Gina K - Tangerine
                          Stormy Sky
                          Grass Green
   Copics: 


Wednesday, July 21, 2021

Hello Summer

     I wanted to make a quick layout using my new The Stamps of Life Sandcastle Card Kit. I ended up getting a little carried away with some Silhouette files. I just love playing with my Silhouette Cameo. 


     I started with 2 sketches, but in the end I moved everything around. I used the provided die cuts in the paper packs and cut fun shaped banners with my trimmer. The row of sunny flowers is a border punch from my collection. The only papers that are not from the kit are 2 sheets each of My Colors: Expresso Bean and Blue. I needed to have some 12 x 12 to get started.


     I die cut one of each of the dies from the sand castle sets with a dark brown card stock and used my picscan mat to upload the shapes into my Silhouetts. I then arranged them as you see above with the word "summer" (a Silhouette cut file) to make a title grouping with one solid piece to glue the elements on to. The sunglasses and sun are from Sunglasses 2 Stamp.


     This really is just a 5 1/2 inch circle with a frame made from 2 circles die cut together. I used items die cut from the kit to make this cluster. VERY QUICK!!!


     This is a Silhouette file that I purchased. I just thought it was adorable and HAD to use it. I added the "summer lovin'" that came in the kit. How fun is that? It would have been 20 times sweeter if I had made it open for journaling on the inside.

Materials:

   Patterned Paper: TSOL - Summer Lovin' Collection
   Card Stock: My Colors - Expresso Bean
                                            Blue
                       TSOL - Sky
                                    Gingerbread
                                    Chocolate
                                    Grape
                                    Sunshine
                                    Tangerine
                                    Powdered Sugar
                                    Kiwi
   Dies: TSOL - Sand Castle 2 Stamp
                         More Sand 2 Stamp
                         Summer Lovin'
                         Sunglasses 2 Stamp
            Burniston - Beach Edges
            Sizzix - Circles
   Punches: EK - Sunflower Edge Punch
   Silhouette Files - Notebook Toon by Sarah Bailey
                             Cool Summer by Craftable


Friday, July 9, 2021

Flippin' Awesome

      Here is BBQ card #3. I used the Elegant Step-Up Card Die for the base of this card. All of the paper is from the Gold Club Kit. I used a pre-colored image for the BBQ pit and die cut the utensils with silver mirror paper. I pop dotted the sentiment on the inside in order to hold up the easel feature of the card. Not much else to say about this one. I finished it very quickly.


Materials: 

   Patterned Paper: TSOL - Totally Rad Collection
   Card Stock: TSOL - Sunshine
                                    Pool
                                    Silver Mirrored
   Stamps: TSOL - More BBQ 2 Stamp
   Dies: TSOL - Elegant Step-Up Card Die Set
                          BBQ 2 Stamp Dies
                          More BBQ 2 Stamp Dies
   Ink: TSOL - Midnight


Tuesday, July 6, 2021

Hey, Hot Stuff!

      After my brain freeze over the weekend, I decided to take action. Saturday I was staring at this BBQ stamp and die set, matching patterned paper, and embellishments with not one idea surfacing. I decided to make an "Idea Jar". I cut 1" x 2" pieces of card stock and wrote all sorts of ideas to give me a boost when I am stuck. I just looked around the room -- ribbon, embossing folder, names of fancy folds, some dies that could be used with any topic, etc.

     When I had a healthy stack of cards to throw in my jar, I drew. I got "SHUTTER CARD", and here it is:  


     I have just completed a total de-clutter of my craft room. I found a stack of these two Bo Bunny patterned papers left over from an Easter layout I did in 2018. You can see the layout here. It worked perfectly with the outdoorsy print on the back of the green leaves. I started with a white card base and matted all panels with Kraft. I then mixed it up a bit with the patterned paper.

    I used my Copics to color the BBQ pit, then die-cut it, and die-cut another out of Kraft card stock to make it sturdier. I added a spatula, tongs, and meat fork, some twine and enamel dots. 


     My B70 Copic marker was almost out of ink. You can see how light the center of the coloring is. I have decided that I like the contrast and have an ink refill ordered.

     The sentiment "BBQ time" was in the stamp set, but I was feeling lazy about masking half of it. Using my Evernote data base, I found a stamp that had the word "time" by itself.

     Here is a pic from another angle:

The IDEA Jar


Materials:

   Patterned Paper: Bo Bunny - Week Adventures

   Card Stock: TSOL - Powdered Sugar

                                    Kraft

                                    Peacock

                                    Silver Mirrored

   Stamps: TSOL - BBQ 2 Stamp

                              Party Statement "time"

   Dies: TSOL - BBQ 2 Stamp

                          More BBQ 2 Stamp

   Ink: Momento - Tuxedo Black

           TSOL - Twig

                          Banana

                          Green Apple

   Copics: BG 70, 72, 75, 78

                  R 35, 37, 39

                  E 42, 43, 44 477

   Embellies: Kraft/White Twine

                      Peacock Enamel Hearts

   Challenges

     Creative Creases - Fun Fold - #15 - *

     Creative Fingers - Anything Goes - #144 - *


Saturday, July 3, 2021

King of the Grill

      I had made 10 cards using The Stamps of Life "Birdbath" Die Hard sets and monthly kit back in April, but never completed the insides of the cards. Yesterday I spent the morning finishing those. I then decided to put the kit up. that means putting the paper, embellishments, etc into stash and move on to the next month of stamps, dies, and kit. That brings me to the BBQ pit. I just couldn't get an idea to start a card. I saw this layout sketch on Sketch N Scrap and shifted my thoughts to making a layout. This layout is made predominately with TSOL products.


Sketch #228 by Stacy Daubenberger


     I used the BBQ pit from the paper pack. I made it into a chipboard piece, so it is very sturdy. 


     I did the BBQ sentiment the same way. 


     The cooking utensils are die cut from silver mirror card stock and I added some Velvet Night ends to give them interest. 


     The intended use for the oven mitt is as a shape card. I thought it would be great if it opened with extra pictures and journaling.


Materials List:

     Patterned Paper: The Stamps of Life - Totally Rad Collection
     Card Stock: My Colors - Velvet Night
                                              Snowbound
                          The Stamps of Life - Cranberry
                                                            Kiwi
                                                            Twig
     Stamps: The Stamps of Life - BBQ 2 Stamp
     Dies: The Stamps of Life - BBQ 2 Stamp Dies
                                                 More BBQ 2 Stamp Dies
                                                 5 x 7 Oven Mitt Fold-It
                                                 Loop Border
                                                 Gingerbread 2 Stamp (stars)
                                                 Stitched Tags
             Anboo - Alphabet
     Ink: The Stamps of Life - Midnight
     Twine
     Silver Mirrored Card Stock

Saturday, March 27, 2021

Take It Easy Dragonfly

      I happened across this card sketch from Sketch N Scrap. I thought it would make a great card and be fun to work with. I have been making cards like crazy with the "Take It Easy" kit from The Stamps of Life. The paper pad had this print in several colors. Since this is card #I6, I chose the colors based on what was left. 

Card with Envelope


Card Sketch #190 by Lisa Hidy

     Everything is glued right onto the card except that the dragonfly is pop dotted. I colored the dragonfly using Copics. 


Inside of Card


16 cards made with the kit

     Some of these cards were heavily influenced by Lisa Mears (9 of them), Jeanne of Spectrum Ink (1 of them), 5 designed by me, and one from a member of the Facebook Stamps of Life Fan Group (can't find it again). 


Materials List: The Stamps of Life
     Card Stock: The Stamps of Life - Powdered Sugar
                                                           Licorice
     Patterned Paper: The Stamps of Life - Take It Easy Paper Pad
     Stamps: The Stamps of Life - Take It Easy Kit
     Dies: The Stamps of Life - Dragonflies 2 Stamp
                                                 More Dragonflies 2 Stamp
     Ink: Momento - Tuxedo Black
            The Stamps of Life - Mint Chip
                                              Candy
                                              Blue Jay
                                              Pixie
     Copics: B0000, 000, 00
                  RV52, 55
                  V12, 15
     Wink of Stella: Clear