Thursday, December 20, 2018

Santa's Belt

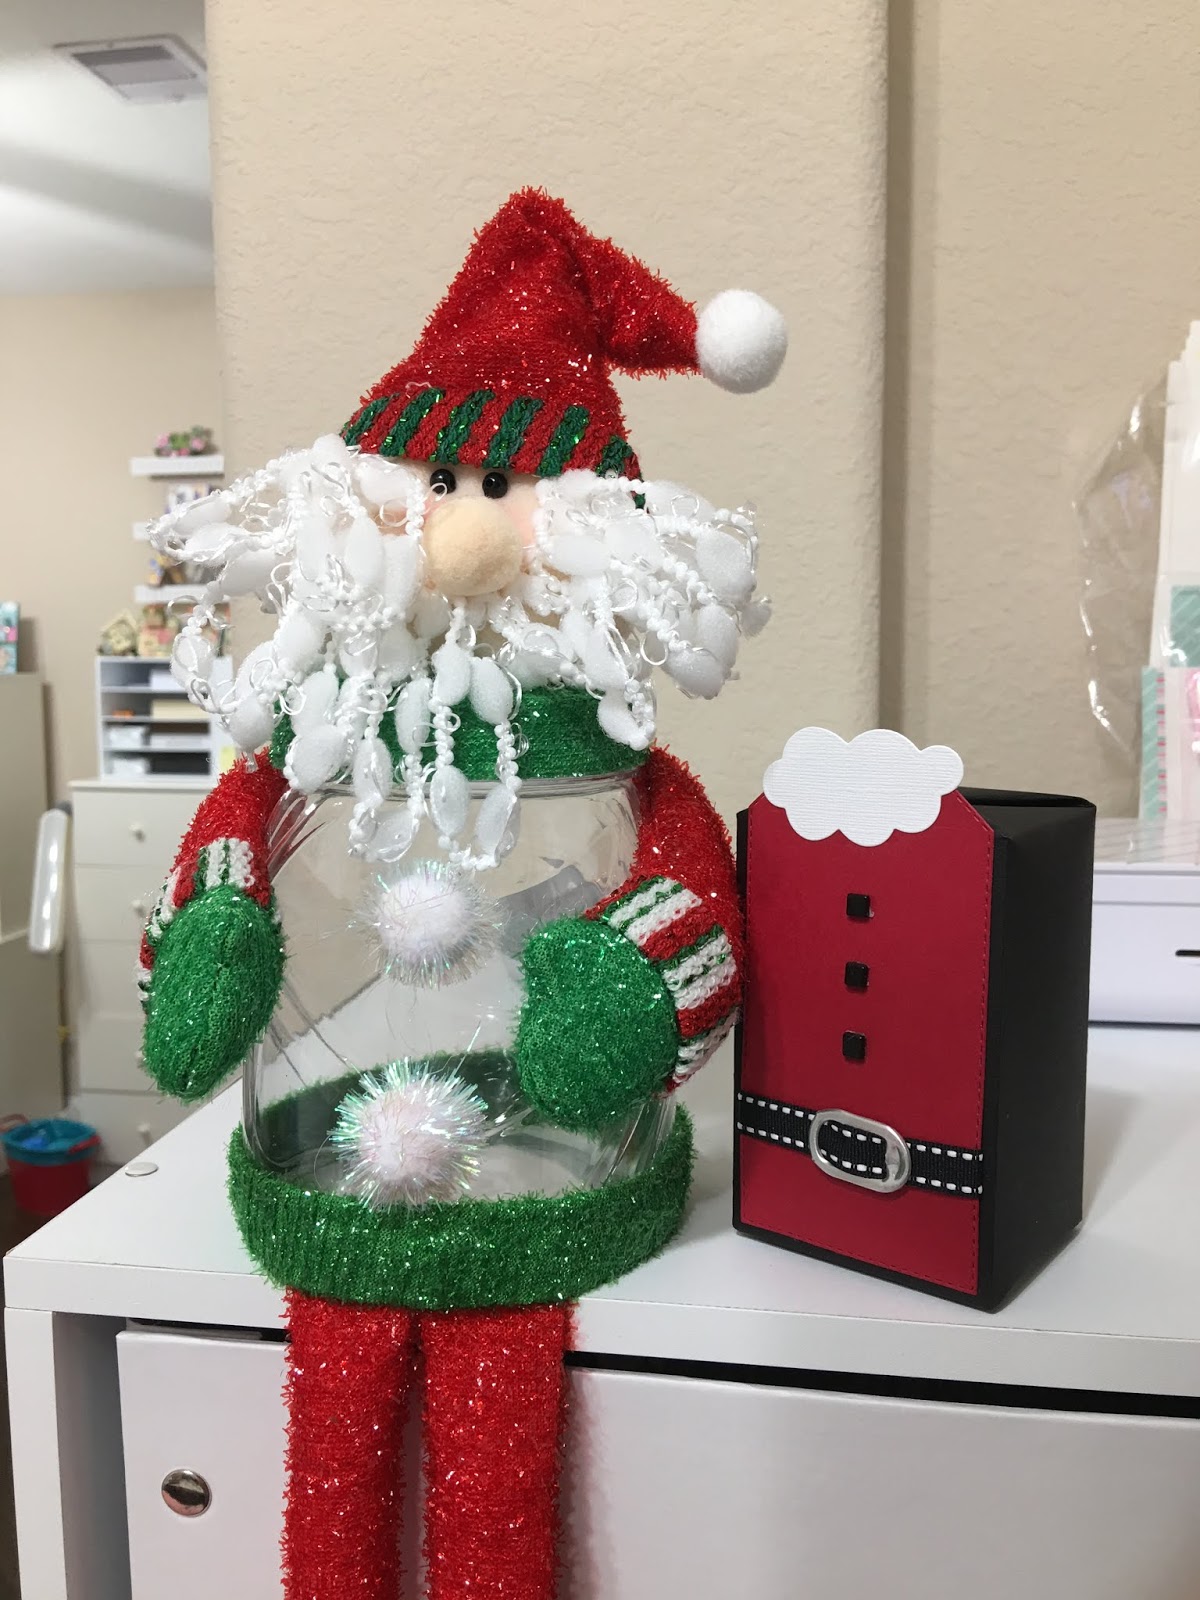
     I have been playing with soda pop tops for the last 3 days. I think I have used 9 of them so far. It all started with some gift tags for under the tree. You can see these tags here.


     When I started playing with this card sketch from Sketch N Scrap, my first thought was -- where is the pop top (Santa Belt) going to be. Once I had that figured out I located this Santa from an old set I had. Sometimes I wish I had dated my stamp sets, so I would know how old they really are. 
     One thing I know for certain is that this paper from Carta Bella is two years old. I have 6 or 7 sheets left from a Christmas tag swap. I chose it here because the red matched the red I wanted to use on Santa's suit. 

Sketch #136 by Lisa Hidy

     I used my Copic markers to color this Santa. I set the picture on large, allowing you to analyze my coloring out of the lines. You can see I took this pic before I added the bling to the tree. 


     Here is the inside of the card. I had several partial sheets of patterned paper, so finding scraps was no problem.

Inside of Card


Materials List:      
     
     Patterned Paper: Carta Bella - Christmas Delivery 
                                                    - Festive Florals
                                                    - Black and Cream Plaid
                                                    - Christmas Tags
     Card Stock: My Colors - Snowbound
                                        Black Magic
     Ink: Momento - Tuxedo Black
     Stamps: Gina K - Christmas Magic
     Dies - Stamps of Life - Ho Ho Ho
     Copics: Face - E53
                Beard, Fur - C00, 0, 1, 2
                Red Suit - R22, 24, 29
                Boots - N5
                Tree - G94
    Embellies: 3/8 inch stitched black ribbon
                    Soda Pop Top
                    Elizabeth Craft Designs: Starfoam Stickers - Red

Challenges

Creative with Stamps - Santa - #20 - Honorable Mention


Sparkles Monthly Challenges - Santa is Coming to Town - #6 - *
Try It On Tuesday - Guess Who's Coming - #25 - *

Monday, December 17, 2018

It's All About the Belt

     It all started here with an ultra-small gift. I actually wrapped it with an 8 1/2 x 11 sheet of solid black card stock. A gift so tiny that all of my tag dies dwarfed it. I decided to make the entire gift top the tag. This is when the first Santa belt - soda pop top happened. It was so very simple. I just added 5mm square gems for buttons and a cloud beard. 


     The next gift I wrapped was considerably larger but I wanted to play with the Santa belts some more . . . so I picked out a Spellbinders mat. I added a Santa head on the side and PRESTO . . . a tag for a larger gift. 


     I was starting to wonder about my sanity here, because I went to dinner last night with "The Dinner Group" (3 other couples that dine together monthly) and took up 4 more pop tops after dinner. Where this will end? I have no idea. 
     I do know that I will posting a Santa's belt card for my design team. You will be able to see it here after December 20.


Materials List:      
     
     Card Stock: My Colors - Snowbound
                                        Black Magic
                                        Firecracker
                                        Coral Rose
     Dies: Stamps of Life - Santa 2 Stamp
             Spellbinders - Labels 23
             Elizabeth Craft Designs - Rainbow Sky
     Ink: Distress - Pumice Stone
    Embellies: 3/8 inch stitched black ribbon
                    Soda Pop Top
                    Square Gems - Black 5mm


Challenges

Dies R Us - #41 - Christmas - *

Tuesday, December 11, 2018

John Deere Pyramid Mini

     This card is in reality a very simple concept. Imagine 8 square cards ( 2 1/2, 3, 3 1/2, 4, 4/12, 5, 5 1/2, and 6 inch) with a mat (1/4 inch border) on the front of each. Attach them one on top of the other. Then add tri-folds, flaps, and pockets. It looks much more complicated than it actually is. I learned to make this in a class taught by Leslie Parlette at Scrappn' Savvy. 


      I have my hard-to-buy-for brother's name for Christmas this year. I decided to make a mini album with pictures of him thru the years with tractors - his favorite topic. 


     I used a piece of linen ribbon to tie the album shut. The pic on the front was taken in 1944. Gary is sitting on the tractor seat while our father steadied him.


On the inside of the 2.5 inch card are two pics matted in circles.


     3 inch card: This had a horizontal tri-fold. I used this section to do a little journaling, added a die-cut Cheepers, the chicken and another pic taken the same day as the one on the front cover. In this picture you can see our oldest sister, Carol Ann. Patterned paper is introduced here. If you google "John Deere digital paper" you will find about 3 different choices on the web. I chose "Diggin Dirt" for several reasons. 
  1. There were 15 different patterns.
  2. I liked the tractor and deer graphics.
  3. I contained plaids, stripes AND polka dots, not to mention this great chevron.
  4. It is purchased from an Etsy Store with an instant download for only $1.50. This is my second time to purchase a collection of digital paper. The last time it was Mario paper. If you have a decent color printer, it is a fun option for hard to find themes.

     3.5 inch card: This is a simple layer. No fancy folds here. Even so, it is one of my favorite. Here you see my brother up on the corn picker and my dad standing below. On the right side are two more corn pickers. They kind of remind me of Heckle and Jeckle, but their names are Cawrl and Cawnie. Great names for crows!


     4 inch card: Here I used a pattern with John Deere tractors on a vertical tri-fold. This provided lots of opportunities for pictures. 


     4.5 inch card: Here my brother is showing off a planter and a tractor that he restored. I grabbed the John Deere logo off of Google images (for my personal use). It is placed on a gate fold. Inside the gate I used my fun crow stamps again. The pic of Gary and his pride and joy 1944 tractor (Where have you seen that year before?) is split between two panels.


     5 inch card: This section features a pocket on the left panel and a flap on the right panel. At 3 AM last Friday, I was laying in bed dreaming up this page. I couldn't get back to sleep, because I was trying to make it in my head. Finally the inevitable -- I gave in about 3:30. I got up and went to the craft room to put this together. 
     I placed Virgil, the pig and half a tree on the left pocket. There are two gift card envelopes die cut from the patterned paper as well as a fun tag for the pocket. On the right flap, I placed Brownie, the cow with the opposite side of the tree die. The cow has made an observation: "Herd there's a Deere in the barn!" When you open the flap, you see a barn with sliding doors. When you slide them open, you see a John Deere tractor, proving Brownie has made a good observation.


     5.5 inch card: I used this vertical tri-fold to place a series of pics from my brother's weekend adventures. One of his favorite pass times is to load up one of his refurbished tractors and take it to a show.


     6 inch card: This section is a regular fold, but with diagonal pockets. In the left pocket, are pics of my brother in his huge tractor shed where he works on his tractors. In the right pocket there are the words to a ballad written by my brother, Terry, to the tune of "Folsom Prison Blues". He wrote it about a two-seater John Deere tractor that Gary made, so Gary and his wife, Grace could ride together. I could not locate a picture of the John Deere tractor, but I was able to find a pic of Gary and Grace, as well as our brother, Lyle, sitting in different kinds of two-seaters. 


     Bottom of the album: I used this cute multi-colored gear paper here. 

     All totaled, I used 16 different die sets. 10 of these are those of Karen Burniston. I love going through my stash of dies, stamps, paper, embellies, etc. etc. etc. That is why I particularly love collecting die cuts.

Materials: 
     Patterned Paper: Happy Heart Creations - Diggin Dirt (Etsy Store)
     Card Stock: My Colors - Holiday Green
                                        Chocolate
                                        Snowbound
                       Bazzill - Candle Glow
     Die: Spellbinders - Long Scalloped Rectangles Large
                                 Long Classic Rectangles Large
            Elizabeth Craft Designs - Gift Card Accordion
            Momenta - Gift Card Holder
            Stamps of Life - Stitched Tags
            Burniston - Cheepers, the Chicken
                             Brownie, the Cow
                             Virgil, the Pig
                             Chicken Wire
                             Western Edges
                             Fence Pop-Up
                             Barn Pop Stand
                             Hey There Pop Stand
                             Nature Edges
                             Tree Top Pop Up
            Silhouette File: Corn Stalks by Miss Kates Cuttables
     Stamps: High Hopes - Caunie & Cawrls Lunch
                                      We're All Ears
     Copics: Y00, 04, 06, 08
                 C1, 3, 5, 7
     Embellies: Linen Ribbon - 1/8 inch
                     Twine - Ivory
                     Alphabet Beads

Challenges

2 Crafty Critter Crazies - Critter - #87 - *
Creative Fingers Challenge - Paper Craft - #36 - December 21
Paper Girls Challenge - Die Cuts - #41 - *


Sunday, December 9, 2018

Winter Cozy Snow Day

     I just love a good snow storm a day when everyone is safe at home and I have no place to go. With the sentiments " It's Cozy inside!" and "SNOW DAY", I am reminded of just this kind of day. 
     I used the flourish as a background for this card, making sure that the birds were visible on the left. I pop-dotted a square from the Collective sheet and placed a short banner diagonally across. I love using these paper flowers from 49 and Market. The leaves are from the large Graphic 45 die. 


     There is even a red floral layer behind the Collective square from Patterns and Solids. I'm all about more layers. I added a chipboard button and brown seam binding. The snowflake is from a punch with a brown pearl in the center.


     The inside of the card has a wide blue border across the top from Patterns and Solids, which is edge punched with snowflakes. I saved the punch poop to place on the ephemera at the bottom. I love using the "back" side of ephemera in order to provide a space for a hand-written message. I centered a "tag" of the ephemera. I liken this piece to a buckle and placed brown seam binding in it. You can see that I added some of the snowflakes that fell out of edge punch to the ephemera.  


     I will be making 16 cards and 4 calendars with this Graphic 45 Seasons Paper. All of these SEASON cards can be made using:

  • one sheet of each of the patterned paper 
  • one sheet of each of  Prints and Solids
In order to make All Seasons cards and calendars, you only need purchase the following items once:
  • Tags and Pockets
  • Chip Board
  • Ephemera
  • Stickers
  • Season's Patterns and Solids 
Stay tuned for more cards this year.
Spring

Summer

Winter
Winter Birdhouse
Winter Cozy Snow Day - You are Here
Winter Pop Up Gift Card Holder
Winter Box on Card
Winter Calendar

  
Materials: 
     Patterned Paper: Graphic 45 - Seasons (Winter)
     Ink: Distress - Walnut Stain
     Die: Spellbinders - Petite Scalloped Circle Large
            Graphic 45 - Large Tag, ATC, & Flower
     Punch: Martha Stewart - Snowflake
                ek - 1/2 inch Corner 
     Embellies: Seam Binding - 2 feet Brown
                     Pearl - 1 Brown
                     49 and Market - Blood Orange Paper Flowers
                                             Buttercream / Champagne
                     

Challenges

Allsorts Challenge - Christmas Flowers - #14 - *
Brown Sugar Challenge - Winter Scene - #21 - *
Ellibelle's Creative Moments - Snowflake/Winter Wonderland - #14 - *
Fussy & Fancy Challenges - Winter - #103 - *
Pixie's Crafty Workshop - 341 - #5 - December 23
Try It On Tuesday - Winter Wonderland - #97 - *

Sunday, December 2, 2018

Snowman Wrapping

     I finally got started wrapping gifts this morning. Now that I am in my new house, I have room to wrap gifts in my craft room. I chose 4 gifts to wrap with this snowman paper, then I looked around the room and I found myself surrounded by all of my punches, dies, card stock, etc. I ended up designing something fun to put on these packages.


     I started with a mini Lucky 8 punch with snowflakes in a 6 inch circle. I wanted the snowflakes to be white so I cut 5.55 inch circles using the Silhouette and attached them to the back of the circle of snowflakes. I used a spellbinders ribbon tag die to cut a snowman from the paper. I also cut two black ribbon tags. I off-set the tags, trimmed the snowman to an oval and glued it all together. The ribbon die is pop dotted to a white circle mat. The green snowflakes are punch poop from the Lucky 8. 


     The ribbon is threaded through the ribbon tag, around the gift, and tied in a bow.


     One of the gifts was too small for the 6 in circle, so I scored and folded it. Hey, check out the snowman made from a sock. My son made that for me for Christmas 14 years ago when he was in the third grade. It is one of my fave Christmas decorations.


     I took a pic of the ribbon tag glued together - off-set. I trimmed the loops to make one larger loop on each end.


Materials List:
     
     Card Stock: Green, Black, and White
     Die: Spellbinders - Ribbon Tag
            Our Daily Bread - Double Stitched Circles
     Punch: We R Memory Keepers - Mini Lucky 8 Snowflakes
     Silhouette: 5.55 inch circle
     Embellies: 1/2 - 3/4 inch ribbon

    
Challenges


Saturday, December 1, 2018

Lovely

     Here is a layout for a pic of my youngest grandchild. It was taken during the week of Easter. She absolutely loved playing with the plastic Easter eggs. 


     As you can see, I stuck pretty close to the sketch by Lisa Hidy. This is the first sketch challenge for the month of December. It is a great one. You could even split the photo in half and use two pics here if you wanted.

Sketch #166 by Lisa Hidy

      I wanted to make flower with this pretty paper and this stitched flower die by Die-Namics. I didn't even cut the dies apart. I cut one of each of 5 different papers. Then I started making flowers. 


Materials List:
      
     
     Patterned Paper: Echo Park - Sunny Days Ahead - Pink
                                                Spring - Blooming Blossoms
                                                             Fancy Floral
                                                             Sparkling Stripe
                                                             Beaming Butterflies
                                                             Stickers
     Card Stock: Bazzill - Maltball               
     Embellies: Doodlebug - Boutique Brads (Bumblebee)
                     Thread Art - 3/8" Ribbon (Woven Diamonds)
     Dies - Die-Namics - Stitched Flowers
              Quick Kutz - Nesting Scallops
              Stamps of Life - Flower Power 2 Fill