Showing posts with label layout. Show all posts

Tuesday, June 2, 2020

Strawberry Picking & Dipping

     The day before Mother's Day, my daughter's family went strawberry picking. They took pictures of Brooklyn picking strawberries. The next morning Brooklyn and her daddy dipped the prettiest strawberries in chocolate as a Mother's Day gift - another opportunity for pictures.


     The strawberries and leaves are die cut from white card stock. At first glance one might think that the edges are inked with a very dark ink. In fact I made 1/16 inch mats for them using the Silhouette. 
     To make the banners, I used the Silhouette to cut the words "PICKING" and "DIPPING" from black card stock. I then used one of La La Land Crafts' Long Flags to die cut while centering the titles.


     FYI: this basket of strawberries weighs a ton. There are so many layers here. The basket is a die-cut - double thickness - and a mat which is also a die cut. All of this coupled with strawberries and leaves makes for a sturdy addition to this layout. 


     These enamel dots are part of a collection specifically made for this paper line from Carta Bella.


     As soon as I saw the pictures from the strawberry field, I went on-line searching for a cute image to color for a layout. This little sweetie was released in July of 2015. I was able to find a new, never-used stamp on ebay. 


Layout with pictures


Just Getting Started

Materials List:
    
      Card Stock: My Colors - Black Magic
                      Carta Bella - Summer Market Solids
     Patterned Paper: Authentique - Summer Market
     Dies: La La Land Crafts - Long Flags
             Elizabeth Craft Designs - Strawberries
                                                 Lady Bugs
                                                 Cupcakes
             The Stamps of Life - Basket Fold It
     Silhouette Font: simply put
                             lucky star
     Stamp: La La Land Crafts - Marci with Strawberries
     Copics: Face - E000, 00, 11, R20
                Hair - E42, 43, 44, 47
                Dress - Y21, 23, 26, 28
                Hat - R81, 83, 85, 89
                Strawberries - R22, 24, 29
                Leaves - YG11, 13, 17
                Basket - E53, 55, 57, 59
     Ink: Momento - Tuxedo Black
            Distress - Cracked Pistachio
            Gina K - Red Hot
                         Jelly Bean
                         Fresh Asparagus
                         Stormy Sky
                         Warm Cocoa
     Embellies: Carta Bella Summer Market - Enamel Dots

Challenges

Creative Fingers Challenge - Anything Goes w/Paper - #101 - *
Country View Challenges - Summer Fields - #3 - June 30
Crafting Happiness Challenge - Summer - #21 - Top Pick!
Diva's That Cut - Summertime Fun - #4 - *
Retro Rubber Challenge - Summer Time - #1 - *
Sparkles Monthly Challenges - Spring is in the Air - #56 - *

Sunday, December 1, 2019

Food + Fun = Family

     I know this is kind of an odd topic for a scrapbook page. I took these pics at the grocery store as we watched the food for a 3-day RV trip with the grandchildren to Jellystone Park go through the checkout. When I looked at these items coming down the conveyor belt, I thought we never buy this kind of stuff - hot dogs, pizza rolls, taquitos, pizza, ham/cheese croissants, sausage/pancake breakfast sandwiches, tater tots, Rice Krispies Treats, Cake in a Mug, etc, etc, etc.


     I turned the sketch on its side to accommodate pic of the receipt.  
Sketch  #190 by Lisa Hidy
     This Authentique paper collection is perfect for the Jellystone layouts, but it is long ago retired and hard to find. I had some leftovers, which I used for this page. Anything with picnicking as a theme is perfect for Yogi Bear.


Materials List:
     Patterned Paper: Authentic - Cheerful
     Cardstock: My Colors - Snowbound
     Stamps & Dies: Stamps of Life - Picnic 2 Stamp
     Embellies: 2 Black Brads
                     Yogi Bear Coloring Book (images)
     

Friday, November 1, 2019

Chillin With Friends

     I took an online class with Stephanie from Stamps of Life this month. We made 3 cards using this exclusive "Arctic Animals 2 Stamp" set and dies.The Igloo Fold It is also exclusive to the class. (You had to be taking the class to be able to purchase this.) In the homework before class we were encouraged to stamp, color, and die cut some extra animals in case Stephanie made a change in the plans. I had several animals left over and I just love to incorporate my stamping into my scrapbooking. 

     I had purchased some glittery aqua paper from Hobby Lobby for the class and had almost the entire page left so I used it to mat the igloo and for the floating sea ice. This sea ice is authentic to our visit to Glacier Bay, Alaska. We even saw mommy otters with babies on their bellies sunning themselves on floating sea ice on the day this pic was taken.


     I used the Silhouette to make the title. I welded together the title and the mats for the walrus and narwal whale. Since I had already made all of the animals before starting this project, it came together super easily. I also welded the two pics in the sketch into one. 

Sketch #188 by Lisa Hidy

Materials List:
     Patterned Paper: Authentic - Alpine
     Cardstock: My Colors - Aquatint
                                       Icicles
                     Distress - Chipped Sapphire
                     Paper Studio - Aqua Glitter
     Dies: Stamps of Life - Igloo Fold It
                                     Arctic Animals
     Stamps: Stamps of Life - Arctic Animals 2 Stamp
     Copics: Igloo - C0
                Whale - BG10  11, 13
                Polar Bear - C00, 01, R20
                Seal - C2, 3, 4
                Walrus - E30, 31, 33, 34; W0, 1
     Silhouette - Chillin' Out by Megan Hardy Designs
     

Tuesday, October 15, 2019

See Ya Soon

     I realize that this may give the impression that I have finally completed the daunting task of scrapbooking the 87 pictures from the Jellystone Park camping trip with the grandchildren. Yes these are the final pics from that trip. Huey is walking the kids to the RV, right before we take off for home. I have all of the pics in groups by topic and this is one of the packs of two . . .


. . . and I needed two pics for this wonderful sketch by Heather Hall at Sketch N Scrap. 
     This page came together so easily. I used one of the kids' orange wrist bands across the picture. I also cut the logo for Jellystone off of the vehicle access tag that hung on the rear-view mirror. The pic in the lower right corner is supposed to be very small so I cut away and into an odd shape to give the illusion of a smaller picture. 
     I used another page from the Yogi Bear Coloring Book that I got at the Jellystone Gift Shop. I colored with Prisma colored pencils and smoothed them out with gamsol. I just love the way the coloring turned out. 
     I used the Silhouette to form the title. I welded together the conversation bubble, Boo Boo and "Leaving". 
     So 9 pictures down and 78 to go.


Sketch #187 by Heather Hall


Materials List:

     Patterned Paper: Echo Park - Happy Days
     Cardstock: My Colors - Black Magic
                                      Aquatint
     Dies: We R Memory Keepers - Alphabet String
     Prisma Colored Pencils: Boo Boo - Light Umber
                                                       Copenhagen Blue
                                                       Poppy Red
                                                       Beige
     Punch: ek - 1 inch corner
     Silhouette - Font - Bubble and Brew
                       Font - Yellow Daisy
                       Layered Speech Bubbles
     Embellies - Logo from Car Tag
                      Park Wrist BAnd
     Page from Jellystone Park Coloring Book

Thursday, August 1, 2019

Candy Bar BINGO

     I have a feeling you are going to be seeing a ton of layouts from our June trip to Jellystone Park in Burleston, Texas. We took two of our grandchildren up with us in the RV. We did so many activities and had so much fun. I have 87 scrapbookable pictures. I hope to get them all on to pages. 
     The first thing we did after setting up the RV was head over to the Bear's Den to play Candy Bar BINGO. As you can see, my grandchildren rock at BINGO. Lucas won first and they said he could have 5 candy bars. He took all of the Skittles. I won next and gave my BINGO card to Ellie so she could get some treats too. She won 3 candy bars and took all Cookies 'n Cream Hershey bars.
     Lucas purchased a Yogi Bear stuffy at the gift shop, so we took a pic of him posing with the BINGO cards.


     I am using Lisa Hidy's sketch from Sketch N Scrap. I had so much fun with this layout.

Sketch #182 by Lisa Hidy
     I went through all of my stash looking for some of those Tim Holtz BINGO pieces. I don't know if I have ever had any of those or not. If I did have them, I certainly don't have them any more. What I did find in my stash were some chipboard circles and stars.

     I used white acrylic paint on the chipboard shapes. I used the Silhouette to cut orange circles and letters, which added to the shapes made BINGO pieces. I laid out the BINGO markers, "Candy Bar" letters, and stars on the Silhouette and made a tan and a green mat to pop them on.

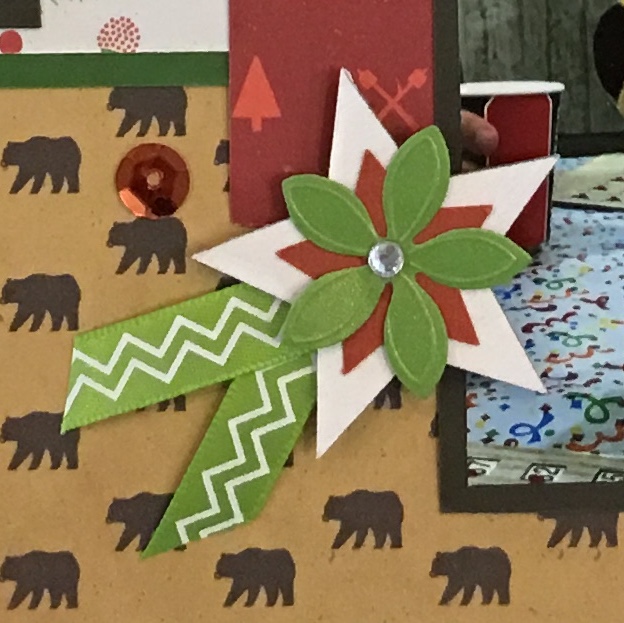
     Here you can see the 3 embellishments I made with the chipboard stars. I used chevron ribbon, smaller orange stars, and green flowers with clear gems in the centers.


Materials List:
     Patterned Paper: Echo Park - The Wild Life
                              (Forest Flora, Wildlife, Under the Stars)
     Cardstock: My Colors - Dark Molassees
                     Bazzill - Holly
                                 S-Mores
                                 Burning Ember
     Dies: Sizzix - Nesting Circles
     Silhouette - Font - Bubble and Brew
     Embellies - White acrylic paint
                      1 inch wood veneer circles
                      Green chevron ribbon
     

Thursday, March 8, 2018

SunKissed Layout

     Graphic 45's "Sun Kissed Collection" is used here to scrap some Destin Beach pictures.


     An unusually shaped tag is made using two stickers from the coordinating sticker sheet. The "Set Sail" and "Fun in the Sun" tags are from the pattered paper. All three buttons from the sticker sheet were matted and ivory seam binding added .


     A faux postcard was made using one of the 4 x 6 pictures. I place acetate over the picture, then used Stazon to stamp a postmark. I mounted a stamp sticker on a stamp die cut. The collage under the picture is made up of fussy cut images, mounted stickers, a bottle cap, a button with seam binding, and a couple small sea shells.


     For the title I used a journaling card cut from the patterned paper. Another collage under this consists of matted stickers, burlap flower, a punched button, purchased flower, and a sea shell.

     I trimmed a 1/2 inch ecru strip with fish tail cuts at each end and placed several banners across it. I used a strip from the patterned paper "Building Sand Castles and Memories" over the top of it. I finished it off with more flowers.

Banners
     Two tags made using the patterned paper.
Tag fronts

Tag backs

Materials:
     Patterned Paper: Graphic 45 - Sun Kissed - Kids At Play 
                                                                   Splish Splash
                                                                   Under the Sea
                                                                   Sand Dollars 
                                                                   Sun Kissed
     Card Stock: My Colors - Soft Blue
                                        Velvet Night
                                        Wildflower Honey
                                        Harvest Orange
                                        Ecru
     Die: Burniston - Rectangle Pull Card (Stamp)
                             Tag Book Pop Up
     Punch: Martha Stewart - Embossed Button
               ek - Dotted Wave Small
     Ink: Gina K - In the Navy
            Stazon - Jet Black
     Stamps: Hampton Art - Vintage Post Card
     Embellies: Ribbon - Ivory Organza
                                 Ivory Satan w/gold trim
                    Eyelets - Mini orange and large brass
                    Sea Shells
                    Burlap flowers
                    Recollections - Flower Stickers

Challenges

Crafty Calendar Challenge - Add a Tag - #22 - *
Deep Ocean Challenges - Shabby/Chic - #16 - *
Dream Valley Challenges - Vintage - #14 - *
Frilly and Funkie - Get in on the Action - #5 - Random Winner
Paper Girls Challenge - Vacation Fun - #3 - *


Thursday, March 1, 2018

Easter Bunny

     These are the pictures from last Easter. I needed to get them in the book before taking new ones this year.


          I love this sketch. You have all month to try it out, post it to the Sketch N Scrap blog, and then be entered for a prize.

Sketch #148
     This page follows the sketch. I used Echo Park's "Easter" collection. The title is a new die cut from Stamps of Life. I purposely placed it above the word "bunny" on the word strip.


     The word strip is continued on to the second page as a connector between the 2 pages. I die cut the year "2017" with a Burniston die and added it below the word Easter.


     The bunny is "Lucky the Rabbit" - a die set from Burniston. I used some pink dotted swiss paper from the collection for the ears, nose and feet. The eggs on the layout are old dies from Echo park. I fussy cut mats for them.


     I need to stop making personal rules. I have a no sticker rule, but here I am using them. I used the tree, a flower, and a pink bunny on this layout. The shiny flowers are also from a sticker set. The grass (Burnistion die) grounds the rabbit and the tree.


This is a flap.

     I found this stamp - "The ears are the best part" at Hobby Lobby a week ago. It was on the clearance rack for 50 cents. It made me laugh, so I bought it. After stamping it I made a flap for it. I used a utility knife to slice a spot to pull the ears of a sticker bunny through. A fun place for one more pic was created. I placed 2 magnets - one behind the pic and one on the back of the bunny mat - to keep the flap closed.

Flap opened
Materials List:
     Patterned Paper: Echo Park - Easter
     Card Stock: My Colors - Expresso Bean
                                        Day Lily
                                        Pink Punch
                                        Lemon Sorbet
     Ink: Gina K - Dark Chocolate
     Stamps: Echo Park - Some Bunny Loves Me
                  Whimsies & Wishes - The Ears Are the Best Part
     Dies: Karen Burniston - Numbers
                                       Lucky the Rabbit
                                       Outdoor Edges
             SOL - Easter Statement
             Echo Park - Decorative Eggs
    Embellies: American Crafts - Flower Stickers

Challenges

Animal Friends Challenge - Easter - #11 - *
Brown Sugar Challenge - Easter/Spring - #35 - March 31
Crafty Friends - Springtime - #91 - *
Creative Shopping (Kreativeinkauf) - Happy Easter - #14 - *

Friday, January 26, 2018

The Tree

     As a youngster, my family celebrated Christmas every year. If you walked into my home a couple of days before Christmas, you might have thought otherwise. There was no tree, no lights, no decorations hanging anywhere. My dad was adamant that "that is not what Christmas is about." I do remember lots of homemade cookies and other special treats, Christmassy school art projects, and a display of the Christmas cards received. We always received a fun gift. It wasn't from Santa and wasn't found under a tree.
     There were 6 children. Today we range in age from 58 - 76. Each of us has a Christmas tree in our homes for the holidays. I have to say that I set the record among us though. I had 6 trees inside my home and 4 outside this year. I love trees. I find them the most beautiful of all of the decorations.
     I decided to capture some of the beauty with this layout. It accommodates 2 pictures of the tree(s) and 4 mats for your favorite ornaments. When I placed the pics on mine, I even sneaked in an extra ornament snapshot just to the left of the 5 x 7.
    The patterned paper is "Alpine" from Authentique. I used shiny silver card stock for some of the mats (as you can see by the glare on the picture frame.


          I will also show you an option to turn the 5 x 7, if that is a better fit for your picture.


Here I show you how to cut the trees. Since you want this paper to be right size up, you can use the pattern on the back for plaid trees. Start with a sheet of 6" x 12" paper.


Sneak in one more tree like this.


Cut the trees and trunk from this plaid paper ( 5" x 12" ).
Materials List:
     Patterned Paper: Authentique - Alpine 2, 4, 6
     Card Stock: My Colors - Soft Blue
                                        Velvet Night
                                        Silver
     Embellies:Crystal Snowflakes
                   
    
Challenges

Crimbo Crackers - Anything Christmas - #28 - *
Crafty Addicts - Winter Blues - #165 - *
Creative Friday - It's Snowing - #10 - *
Holly and Ivy Christmas Challenge - Christmas - #67 - *
Merry Christmas Challenge - Anything Christmas - #21 - *
That's Crafty - Feeling Blue - #82 - *

Tuesday, January 2, 2018

Christmas Train


     We are starting a New Year and Sketch N Scrap is starting a new month-long challenge. The first sketch of 2018 is a layout.

Sketch #144
     Our HOA sponsored a Christmas Train on December 9. The grandchildren came over dressed in their Christmas finery. I rode the train with them telling them that we were going to the North Pole to see Santa. When we walked into the clubhouse we jumped in line to tell Santa our Christmas wishes. Lucas ran right over to talk to Santa, but Elena wasn't interested in talking to him until he held out a candy cane. 


For the layout, I needed to slant the photos on the first page in order to accommodate the train. The train and tracks are from a Stamps of Life die set from 2013.


Subtitle

I used the Silhouette to create a transition from train ride to our chat with Santa. This is "North Pole" by Kate's Cuttables.


     For the journaling tags, I cut two red circles with words on the Silhouette. I placed a smaller brown circle mat behind each.


Materials List:
     Patterned Paper: Doodlebug Designs - Santa Express (Evergreens)
                              Pebbles - Birthday Wish (Yellow and Blue Polka)
     Card Stock: Bazzill - Maltball
                       Gina K - Red Hot
                       Shiny Silver
                       Scraps   
     Dies: Stamps of Life - Train 2 Stamp
             Elizabeth Craft Designs (Burniston) - Jolly the Mouse (candy cane)
     Silhouette: Miss Kate's Cuttables - North Pole Sign
                    Font: Bubble and Brew
     Embellies: White Felt Snowflakes
                    Red Pearls

    
Challenges
Brown Sugar Challenge - Not a Card - #140 - *
ITD's Creative Playground - Anything Crafty - #35 - *
Pixie's Crafty Workshop Challenge - #313-14 - Snippets - #55 - *